By Viswam Sathiyanarayanan, Senior Research Analyst
Global Dimensional Metrology Market Overview—2017
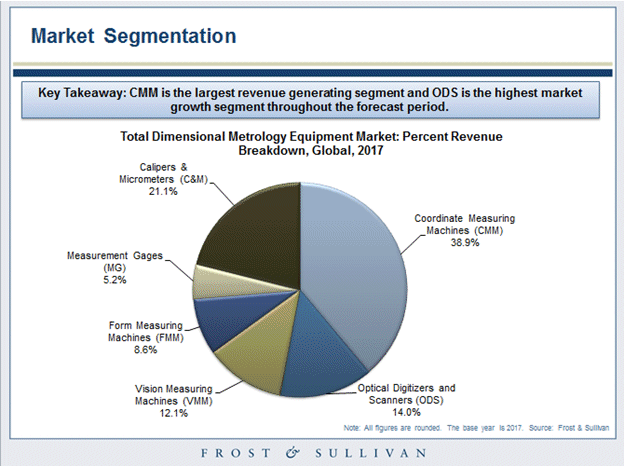
Dimensional metrology equipment has evolved tremendously over the past decade with the increased advancements in automation and manufacturing capabilities. The highest market growth for dimensional metrology equipment is associated with an increase in end-user demand to minimize errors throughout the entire manufacturing life cycle of a product and improve the product quality in order to stay competitive. In addition, end users such as automotive, aerospace, and medical device manufacturers are accuracy-centric industry verticals and have stringent quality norms because even a minor defect can lead to fatal damages. The different categories within the dimensional metrology equipment market are listed below:
CMM and C&M is traditional metrology equipment that is used across various industry verticals for quality inspection. The C&M market is mature and the product cost is very low compared to other metrology equipment. This leads to a higher number of C&M units being sold, which leads to higher revenue generation. Metrology equipment such as bridge-type CMM, VMM, FMM, and MG are experiencing moderate growth over the forecast period with advancements in ODS and inline metrology solutions. However, technology advancements and the portability of articulated arms, handheld scanners, optical digitizers, and scanners are poised to have the highest market growth potential in the future, disrupting the traditional metrology equipment market growth. In addition, these systems have tremendous opportunities for inline metrology application and to potentially boost future demand.
Future opportunities for Dimensional Metrology Equipment Market
1. Inline metrology
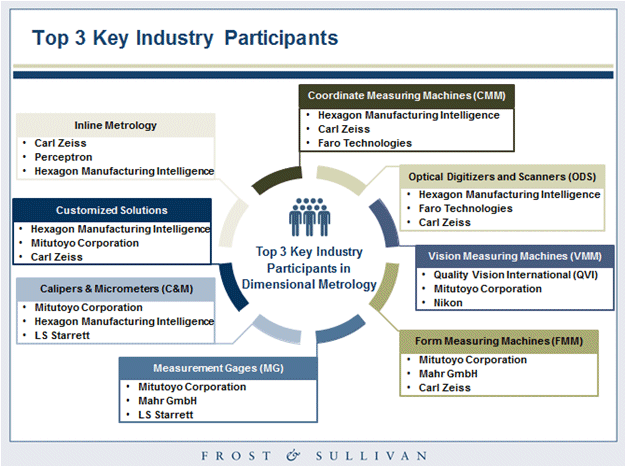
Inline metrology is the continuous migration of metrology equipment onto the shop floor, where end users can integrate high-precision and automated metrology solutions such as CMMs and optical scanners and place them either close to assembly lines or within assembly lines. With the increased manufacturing automation across industry verticals and evolving Mega Trends such as Internet of Things (IoT) and Industry 4.0, end users are constantly investing in inline metrology solutions to minimize the inspection delay in production process, increase the product quality, and reduce human intervention. A typical inline metrology system should measure dimensions, inspect parts, provide faster measurements, and store the data for further processing. Advances in the features of vision sensors and optical scanners are likely to have a significant impact on the growth of inline metrology solutions. In addition, this creates new opportunities for dimensional metrology vendors to provide data analytics as a service for end users. Metrology giants such as Carl Zeiss Industrial Metrology, Hexagon Manufacturing Intelligence, and Mitutoyo Corporation are highly focused on developing their portfolio in this market segment. Other large metrology vendors are also highly involved in the acquisition of data analytics and cloud-based software providers, which will increase their competitive edge.
2. High-end Robotic Guidance
High-end robotic guidance is comprised of 3-D vision cameras that guide machinery to perform various operations. For example, these cameras can provide a robot with the ability to move and place objects with a high degree of accuracy. With full 3-D robotic guidance, the robot can locate and position parts with six degrees of freedom: X, Y, Z, roll, pitch, and yaw. Previously, robotic guidance was mainly used to pick and place objects—only employing 2-D vision cameras. With the increased demand towards automation, manufacturers are beginning to employ 3-D vision cameras with metrology capabilities for high-end robotic guidance applications to enable a faster and more accurate manufacturing process. In addition, these systems reduce the cost involved in manufacturing because component or equipment placement accuracy is enhanced at low processing time increasing the overall profitability of the manufacturing process.
3. Smart Portable and Handheld Metrology Devices
Smart portable and handheld metrology devices include portable articulated arms, handheld optical scanners, and smart digital gauges with wireless data transferring capabilities. These systems are highly adopted by the automotive, aerospace, and industrial sectors to increase their production capability and achieve minimum defects. Market growth is primarily due to the increased focus on R&D across industry verticals, particularly in the automotive industry. Earlier, fixed optical scanners were used for prototyping, design comparison, and reverse engineering. Although these systems offer a high degree of accuracy, their flexibility, size, and line of sight are limited. Handheld scanners are the only alternates that can help overcome these challenges, even though their accuracy is lower than that of fixed scanners. In addition, the price range of fixed metrology devices is much higher than that of handheld systems. Thus, manufacturers are willing to invest in handheld systems because these give them 6 degrees of freedom over the manufacturing unit. Frost & Sullivan research indicates that top metrology vendors will invest in handheld optical scanners and portable optical CMMs in the next 3 to 5 years.
For any queries related to this article, please contact the author Viswam Sathiyanarayanan at [email protected].


